
Let’s Encrypt is a free TLS server-certificate service provided by the US foundation Internet Security Research Group (ISRG). Its motto is free, automated, secure, transparent, open, and cooperative, and the foundation itself is a 501(c)3 nonprofit 1. Its Technical Advisory Board includes friends such as Joe Hildenbrand and Karen O’Donohue. Although www.sakimura.org has supported TLS, I had skimped on certificate costs and avoided the cumbersome configuration, so nat.sakimura.org and similar sites had not. With this service available, however, there are no more excuses. Let us configure it.
Installing Let’s Encrypt
To configure it, we must first install Let’s Encrypt. It appears to be available as a package in some Linux distributions, but the Ubuntu release I use does not include it. We therefore begin by using git to download the files from GitHub.
$ git clone https://github.com/letsencrypt/letsencrypt
$ cd letsencrypt
$ ./letsencrypt-auto --help
Oops, various errors appear. Apparently Python is too old. The installed version is Python 2.7, which has various problems such as lacking SNI support. I therefore installed Python 3. Using aptitude, I installed python3.4-venv.
Now, let us compose ourselves and try again:
$ ./letsencrypt-auto --help

Updating letsencrypt and virtual environment dependencies......
Requesting root privileges to run with virtualenv: sudo /home/nat/.local/share/letsencrypt/bin/letsencrypt --help

  letsencrypt-auto [SUBCOMMAND] [options] [-d domain] [-d domain] ...

The Let's Encrypt agent can obtain and install HTTPS/TLS/SSL certificates.  By
default, it will attempt to use a webserver both for obtaining and installing
the cert. Major SUBCOMMANDS are:

  (default) run        Obtain & install a cert in your current webserver
  certonly             Obtain cert, but do not install it (aka "auth")
  install              Install a previously obtained cert in a server
  revoke               Revoke a previously obtained certificate
  rollback             Rollback server configuration changes made during install
  config_changes       Show changes made to server config during installation
  plugins              Display information about installed plugins

Choice of server plugins for obtaining and installing cert:

  --apache          Use the Apache plugin for authentication & installation
  --standalone      Run a standalone webserver for authentication
  (nginx support is experimental, buggy, and not installed by default)
  --webroot         Place files in a server's webroot folder for authentication

OR use different plugins to obtain (authenticate) the cert and then install it:

  --authenticator standalone --installer apache

More detailed help:

  -h, --help [topic]    print this message, or detailed help on a topic;
                        the available topics are:

   all, automation, paths, security, testing, or any of the subcommands or
   plugins (certonly, install, nginx, apache, standalone, webroot, etc)
This time it seems to have worked.
Obtaining a Certificate and Configuring the Web Server
Now we obtain the certificate. Apache users have a convenient command:
./letsencrypt-auto –apache
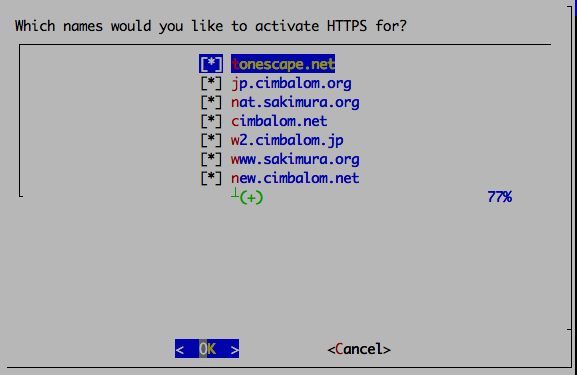
This is supposed to install it, but I could not see how to specify the domain name. I ran it anyway, and a screen like Figure 1 appeared. Apparently this is where one selects the sites to enable for TLS. Sites that do not need TLS can be deselected with the half-width space key. (Entering a full-width space crashes the software.)
On the next screen, specify an emergency contact email address for cases such as losing the key, then agree to the terms of service 2 on the following screen.
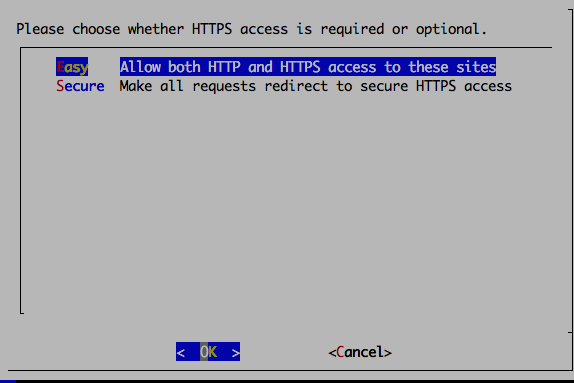
I feel that Secure—that is, HTTPS-only—is really the proper choice. But doing that would reset the hard-earned Facebook “Like” counts on past articles to zero, which would be sad, so I select Easy (supporting both HTTP and HTTPS).
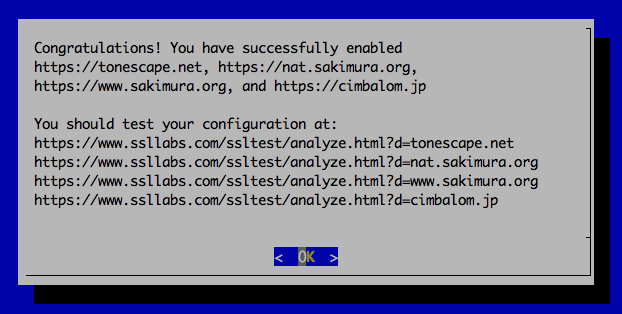
That alone completes installation of the TLS certificate and configuration of the web server. Amazing. I had expected to write all sorts of Apache configuration, but it seems to do everything automatically. Looking in /etc/apache2/sites-enabled, there are configuration files named “domain-le-ssl.conf,” such as cimbalom.jp-le-ssl.conf. From this, it appears that when there are multiple virtual hosts, it uses each HTTP configuration file to automatically generate an SSL configuration file.
Checking the Configuration
The finishing touch is to visit the QUALYS site and check the TLS configuration. As shown above, specify it in a form such as https://www.ssllabs.com/ssltest/analyze.html?d=sakimura.org and test the status. The result for this site was as follows.
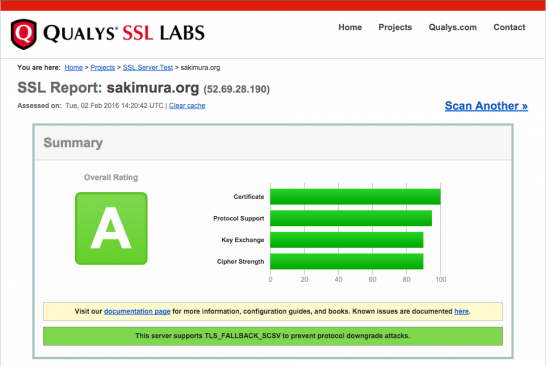
It is not a perfect score, but it seems reasonably good.
Remember Before 3 Months Have Passed
This was my first time using Let’s Encrypt, and I was impressed by its convenience. It makes me wonder what all the previous work configuring TLS was for. There can no longer be any excuse not to use TLS.
On the other hand, I realized that preparation is needed to use it conveniently. A prime example is that even when a domain name itself, such as sakimura.org, is not intended to be accessed as a server, it is better to configure its web server before running Let’s Encrypt. (QUALYS called this “Confusing.”) Certificates obtained with Let’s Encrypt are valid for just under 3 months, so I intend to improve this before next time. Automatic renewal can come after that.
Until next time!
Footnotes
- a status that is fairly difficult to obtain
- https://letsencrypt.org/documents/LE-SA-v1.0.1-July-27-2015.pdf.
Related posts
I Will Appear on the Okinawa Open Days Panel “Current and Future OSS Initiatives in Economic Security”
It is already the day of the event—in fact, I am writing this now (12/4 9:45) at my desk while preparing for the panel—but I will…

The “DS-511 Guidelines for Handling Digital Identity in Identity Verification for Administrative Procedures, etc.” Have Been Published
After 3 years of development, the Digital Identity Guidelines, to which I had the privilege of contributing as an expert (Expert Meeting on the Revision of…

Age Verification: The UK Online Safety Act Is Being Toyed With in All Kinds of Ways—Bypassing It With VPNs and Evading Biometrics With Death Stranding
What Is the UK's Online Safety Act? The UK's Online Safety Act formally became law after receiving Royal Assent on October 26, 2023, and came into…
You must be logged in to post a comment.